Pavement update

If you thought art was the realm of limp-wristed aesthetes, think again! My arms are aching from lugging the paving stones into the house to ensure they dry off before varnishing. By the time I’ve got the pavement delivered to the gallery, arranged it, packed it up and brought it home again, I’ll be able to beat all comers at arm wrestling. 😉

I had to help speed up the drying process a bit with a hairdryer.

hairdryer

I then had a bit of a wobble about the varnish. I considered doing without varnish at all, but it does increase the contrast and help the leaf prints stand out against the background. It will also help to protect the prints in case anyone does decide to walk on the pavement. 🙂 And I’m not sure how light fast the prints are – I notice that most of the natural prints on the pavement round the corner have now disappeared.

I had a spare test stone where I tried out some yacht varnish, which had a satin finish but was far too shiny. So I moved on to a matt varnish, which was much better (though still with occasional shiny patches). It also tends to emphasise the pimply texture of the stones.

I tried “spot varnishing” the leaves only, leaving the background unvarnished. But that looked too artificial, as if the leaves had just been painted on. So in the end I painted a thin layer of matt varnish over the whole stones.

varnish beforevarnish after

Now all I have to do is protect the surface of each stone to avoid damage during delivery to the gallery on Wednesday, and spend a couple of hours arranging them.

What_Is_Urban_flyer

What is Urban? is organised by South London Women Artists and runs from 26 February to 11 March 2015 at Brixton East Gallery, 100 Barrington Road, London SW9 7JF, 11am-5pm daily.

The private view is on Thursday 26 February, 6.30-9pm  – everyone welcome. I will be there for the first hour or so, as I have to go to my bookclub afterwards.

Printing on pavements

In a previous post I mentioned that I was working on a piece for an exhibition being organised by the South London Women Artists in February, on the theme “What is Urban?”.

My interpretation of this theme started from the view that although we refer to urban areas as “concrete jungles”, the urban environment is but a thin veneer. Without armies of gardeners and maintenance workers, cities would turn wild very quickly as nature reclaims the land. In his book The World Without Us, Alan Weisman claims that if humans suddenly disappeared, residential neighbourhoods would become forests within 500 years.

leaves on pavement

Even if this urban veneer is regularly maintained, nature finds a way to leave her mark on it. In the autumn, pavements that are more commonly pocked with the remains of carelessly discarded gum become the canvas for leaf prints, as the leaching tannins from the leaves are pounded into the concrete by scurrying commuters and shoppers.

leaves on pavement 2pavement prints6pavement prints12pavement prints13

So I decided to try to recreate these ephemeral marks on pavements, by arranging dead autumn leaves on paving stones, soaking them and stamping on them. Although rather removed from my work as a textile artist, it does relate to my experiments of using leaves to make eco prints on fabric.

23 nov 1

Inevitably, trying to reproduce a natural process in a more controlled fashion has proved quite challenging. When I started in November, we were going through a period of wet weather, so I left the stones uncovered and just went out every day to stamp on the leaves.

However, when the weather became drier, the leaves quickly dried out and started blowing away! So I had to water them again, cover them in plastic weighted down with stones, and then stamp on top.

1 dec11 dec 3

And on a couple of occasions I went out to find that local urban foxes had left their own organic deposits on the stones! 😦

In my initial experiments with different types of leaves, I had assumed that oak leaves, being relatively high in tannin, would give good prints (they often work well on fabric). However, this proved not to be the case on concrete – it was maple leaves that worked best.

I also tried adding vinegar and bicarbonate of soda (separately!) to the soaking water to see if they help the tannins to leach faster. To be honest, I haven’t noticed a huge difference with either of them.

I had to get my final submission for the exhibition in before I go on holiday tomorrow, so today I unwrapped a couple of the stones to take some photos to send with my application. They are actually quite difficult to photograph, as the prints show up differently depending on the angle of the light, but here are a few examples.

11 jan-3 stones

Unlike the random prints I previously photographed on pavements, which were darker than the stone, these prints are often lighter, resulting in a strangely ghostly photographic effect.

Kim Winter 1-1000px Kim Winter 2-1000px Kim Winter 3-1000px Kim Winter 4-1000px

I have no idea why this is, and I was a bit disappointed at first, but the effect is growing on me. And in the close-up shots you can see a surprising amount of detail.

So I’ve given them a last water, re-covered with plastic and stamped on them for the last time before I go to India for a month.

The next challenge will be getting them to the gallery at the end of February and arranging them without doing my back in – they are very heavy!

I won’t be blogging again till I get back from India, as I won’t have the time or technology while I’m on the move. But I’ll certainly be telling you about the mud resist indigo block printing when I get back – adieu till then!

Natural dyeing workshop with Cordwainers Garden

I’m still finding my feet with this eco printing lark. Results are slowly improving – here’s a cotton bag, mordanted with aluminium acetate, bundled with peony leaves, coreopsis flowers (only two – the slugs ate all the rest!), eucalyptus leaves and some sycamore “helicopter” seeds, and put into an onion skin dye bath.

peony bag1

I dipped the peony leaves and sycamore seeds into an iron mordant before bundling. The sycamore seeds didn’t show up at all, but the peony leaves worked quite well. The first picture below shows peony leaves with the head of a coreopsis flower in the foreground (damn those slugs!).

peony bag2 peony bag3

So off I headed to a workshop on natural dyeing run by Kate Poland of Cordwainers Garden, a community garden set up on a disused piece of land belonging to the London College of Fashion in Hackney. As well as growing fruit, vegetables and dye plants, they are also co-ordinating a project called Grow a London Garment – trying to grow, design, dye and sew a linen garment from scratch, using flax grown in various locations across London. They are currently on the lookout for flax spinners, so get in touch if you know anyone!

The workshop was held at the fantastic Surrey Docks Farm in Rotherhithe, right next to the river. It was slightly surreal to be picking leaves from the dye garden with Canary Wharf looming just across the Thames!

dye garden

We started with some itajime shibori – folding pieces of silk before clamping or tying them, wetting them and then putting them in a madder dye bath for a couple of hours. Kate had dug up the madder root came from the farm’s dye garden, and ground it in a coffee grinder before simmering it in water. She took the pot off the heat before we put in our fabric.

madder bathmadder shibori

Then we went on to bundling, using leaves and flowers from the dye garden as well as a selection Kate had brought with her. Rather than getting clear leaf prints, we were aiming for a watercolour effect, using more flowers than leaves.

kate bundling

We steamed the bundles for about 20 minutes before opening them – the results were very successful.

steamed bundles steamed bundles2 steamed bundles3

The dark purple comes from hollyhock flowers, the orange is onion skin, and the yellow is dyers’ camomile. Below you can see a close-up of the onion skin.

steamed bundles4 steamed bundles5

I also used woad leaves, which were’t very visible when the fabric was wet. You can see them more clearly in the picture below, when the fabric was dry and ironed – the stalks are sticking up on the left of the picture between the purple hollyhock petals.

steamed bundles6

While all this was going on we had a curious spectator peering in through the window – love the haircut! 🙂

rasta sheep

Finally, we set up some solar dyeing to take away with us. We each chose a single type of plant dye – hollyhocks, dyers’ camomile or Hopi sunflower seeds (which have to be boiled first to extract the kernels, from where the colour comes) – and put them in a jam jar with water and fabric to take home.

Here’s my jar of hollyhock solar dye – you’ll have to wait for a few weeks for the results!

solar hollyhock


Eco printing samples part 2

In my previous post on eco printing I wondered whether the faintness of the prints, especially on felt, was due to the fact that the steam couldn’t penetrate the felt very easily when it was rolled up.

simmer sample group

So I performed a similar experiment but this time I immersed the bundles in hot water and onion skins and simmered them for an hour. Then I left them to cool overnight and opened them up the next day.

The results were definitely better, particularly on felt.

simmer sample felt eucalyptus

Interestingly, the eucalyptus on felt (above) printed orange, no matter what the mordant, while the rose leaf and petal dipped in iron mordant (below) came out best.
simmer sample rose felt

The iron mordant also worked best for sycamore leaves on felt (below).
simmer sample sycamore felt

Oak leaves on cotton mordanted with aluminium acetate (below) gave a  lovely clear print, regardless of which mordant was used on the leaves (or even when none was used at all).

simmer sample oak cotton

Sycamore and rose leaves also printed quite well on cotton, but those dipped in the iron mordant were clearest.

simmer sample rose cotton simmer sample sycamore cotton

On silk, iron-mordanted sycamore and oak leaves did best, while eucalyptus and rose leaves were pretty similar for all mordants.

simmer sample sycamore silksimmer sample oak silksimmer sample eucalyptus silk simmer sample rose silk

Conclusion? It looks as if full immersion rather than steaming is the best way to go, unless I can get a large pressure cooker or find some other way of forcing steam through the fabric more efficiently.

Eco printing samples

My eco printing so far has been a bit hit and miss, so I thought it was time to be a bit more systematic. From the reading I’ve done on the subject, there are so many variables – from the pH of your water to the time of year you pick the leaves or flowers – but I thought it would at least be useful to have a few reference samples to work from.

I used four different types of fabric:

  • white merino felt
  • white cotton (pre-mordanted with aluminium acetate)
  • lightweight cream silk from an old wedding sari
  • some sort of synthetic open-weave fabric from an old curtain.

Only the cotton was pre-mordanted – the other fabrics weren’t treated in any way.

Then I prepared four different mordants:

  • vinegar
  • milk
  • alum solution
  • iron solution (well, not really! I’d bought some ferrous sulphate but couldn’t find it anywhere, so I ended up shaking some rust flakes in water in the hope that the effect would be similar. Of course, rust doesn’t dissolve in water, so this was pretty pointless really).

And the vegetable matter I was testing:

  • eucalyptus leaves
  • rose leaves
  • oak leaves
  • Japanese knotweed leaves
  • onion skins.

I laid out a strip of felt and put five eucalyptus leaves on it. The first one had no mordant; the other four were each dipped in a different mordant. I then laid five rose leaves next to them, treated in the same way. I put the strip of synthetic fabric on top, and rolled the bundle around a piece of bamboo, and tied it up. This was bundle 1.

I repeated this three more times with different combinations:

  • Bundle 2: cotton and silk with eucalyptus and rose leaves
  • Bundle 3: felt and silk with oak leaves, Japanese knotweed and onion skins
  • Bundle 4: cotton and synthetic with oak leaves, Japanese knotweed and onion skins.

eco sample bundles

I colour coded them with different bits of yarn, although it was pretty obvious which was which. Then I steamed all the bundles for 1.5 hours and left them to cool overnight.

The results were mixed, to say the least.

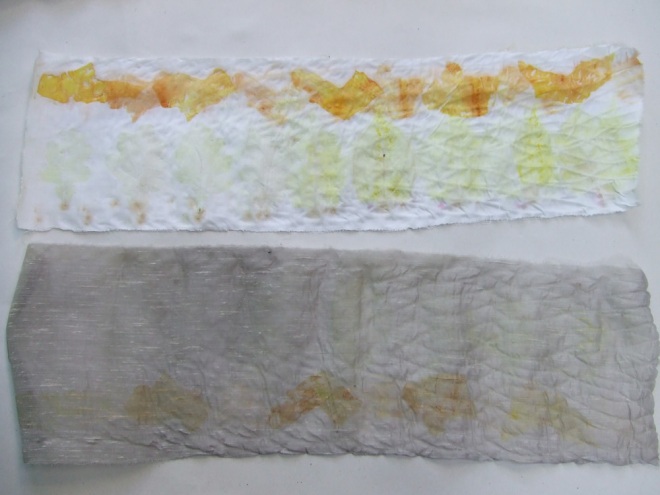
Bundle 1 - eucalyptus and rose leaves on felt (above) and synthetic (below)
Bundle 1 – eucalyptus and rose leaves on felt (above) and synthetic (below)
Bundle 2 - eucalyptus and rose leaves on cotton (above) and silk (below)
Bundle 2 – eucalyptus and rose leaves on cotton (above) and silk (below)
Bundle 3 - oak leaves, Japanese knotweed and onion skins on felt (above) and silk (below)
Bundle 3 – oak leaves, Japanese knotweed and onion skins on felt (above) and silk (below)
Bundle 4 - oak leaves, Japanese knotweed and onion skins on cotton (above) and synthetic (below)
Bundle 4 – oak leaves, Japanese knotweed and onion skins on cotton (above) and synthetic (below)

The onion skins were by far the strongest on all fabrics except the felt, whichever mordant was used.

Onion skin with alum mordant on silk
Onion skin with milk mordant on silk

The cotton gave the strongest prints overall, in rather an acid yellow (presumably due to the aluminium acetate mordant).

Eucalyptus prints on cotton
Japanese knotweed and onion skins on cotton
Onion skin with milk mordant on cotton
Rose leaves with no mordant and vinegar on cotton

I was most disappointed with the felt – the best prints were the eucalyptus and the Japanese knotweed, but they were very faint.

Eucalyptus on felt
Eucalyptus on felt
Japanese knotweed on felt

Very little printed on the synthetic fabric at all, as far as I could see.

Why were these prints so faint? I’ve seen amazing prints produced by textile artists like Irit Dulman, especially on felt. I wondered whether steam alone can penetrate right into the bundle of felt, which is fairly thick. So I did another experiment where I submerged the bundles in a pot of onion skin dye – this will be the subject of a future post! 🙂

In the meantime, to try to darken the prints, I put all the samples above into a post-mordant of ferrous sulphate.

The iron worked wonders on the silk. It really brought out the Japanese knotweed prints, turning them a dark khaki. And the eucalyptus and rose leaves became much more distinct.

Silk eco print with iron post-mordant

The prints on the cotton that were previously strong yellow turned much darker, and two of the oak leaf prints that were previously very faint came to the fore beautifully.

Cotton eco print with iron post-mordant

Even on the synthetic fabric the prints were now faintly visible, whereas before they were practically non-existent.

Synthetic eco print with iron post-mordant

The felt remained disappointing, however.

Felt eco print with iron post-mordant

So maybe if I’d used a proper ferrous sulphate mordant on the leaves before steaming, the results would have been different – who knows?


Eco printing on eggs

A quick Friday afternoon project, following the instructions in India Flint’s book Eco Colour. She says it’s a Latvian tradition, but my friend Magdalen says they do it in Ireland as well.

I pressed some small leaves against the shell, then wrapped the egg in onion skins and put it in an old popsock. Put the eggs in a pan with water and more onion skins, and boil for 10 minutes. Let it cool, then unwrap the eggs – voilà!

egg1 egg2 egg3 egg4

Tuna niçoise for supper tonight. 😉