Ecoprinted wedding dress

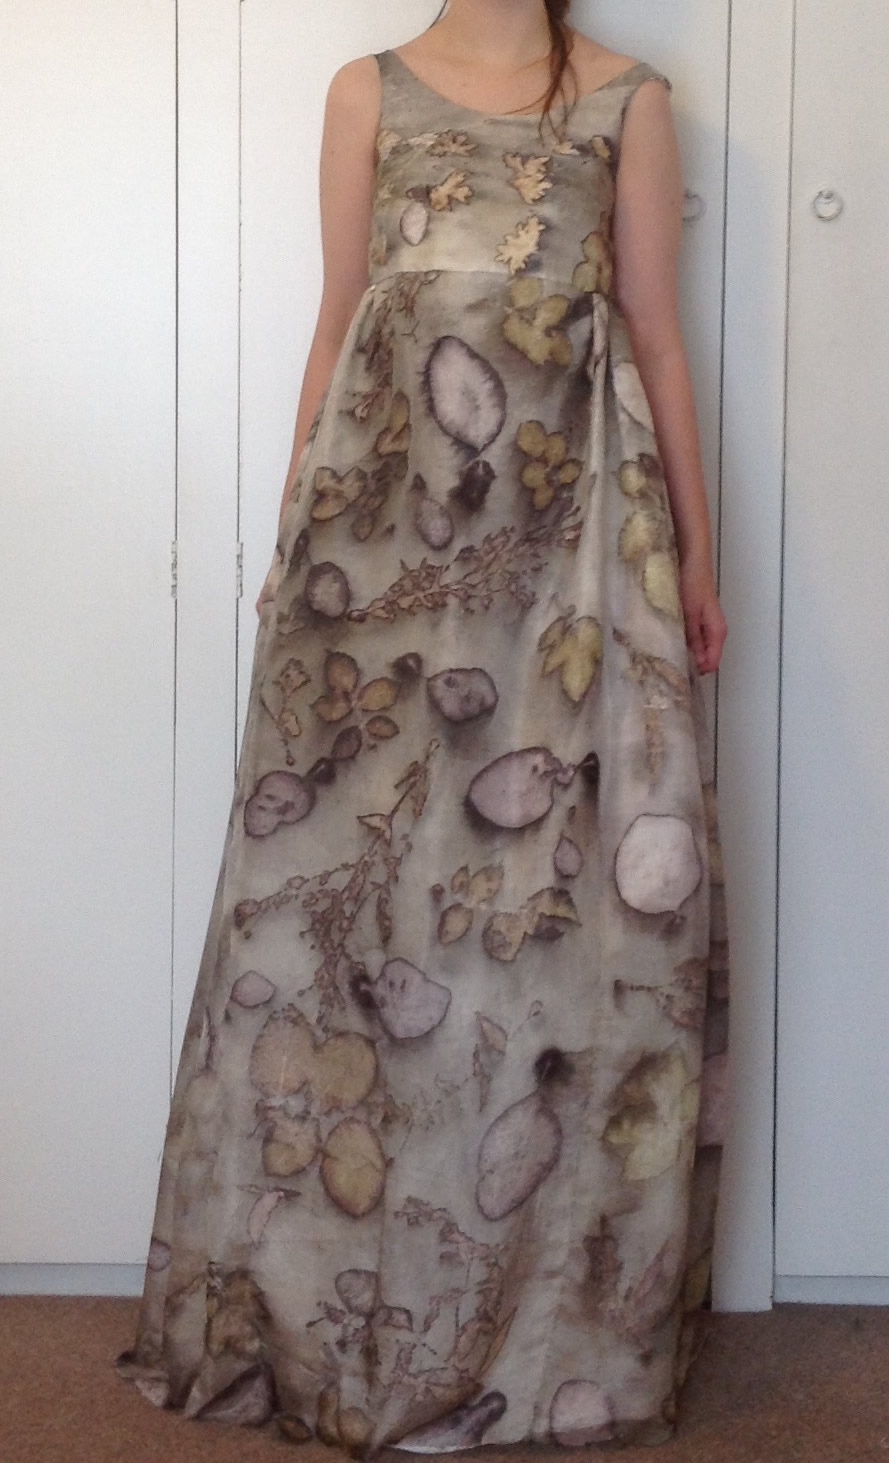
A couple of months ago I showed you a sneak preview of some ecoprinting I’d been doing for a special commission. I can now reveal (drum roll!) that I was working on fabric for a wedding dress.

Photo: The Kitcheners

The stunning photo above is by The Kitcheners, who were the official wedding photographers. It reminds me of a Pre-Raphaelite painting, with the woodland setting off the autumnal colours of the dress perfectly.

It was nerve wracking to be asked to produce the fabric for such a special occasion but I’m over the moon with how it turned out.

ecoprint wedding dress ecoprint wedding dress

It started when Daisy, an Etsy customer who had bought one of my ecoprinted scarves, contacted me to say that her daughter Mary was getting married, loved the scarf and wondered if I could ecoprint some silk for her wedding dress.

I admit my first reaction was panic. What would happen if it all went wrong on such a big occasion? And then there were the practicalities – I steam my ecoprinted fabric in a fish kettle, which limits its width to around 50cm, and I thought a wedding dress would require acres of fabric. But I agreed to talk about possibilities.

When we met up I explained the limitations of my facilities, but after we discussed the design of the dress they were interested in, it became clear that it could be possible.

I went off and printed some samples so that Mary could choose which colours and shapes she liked – and then took a deep breath and started printing the actual fabric. As ecoprinters know, there can be considerable variation in how leaves print, depending on the time of year, so it was important to try to get consistent results by printing all the fabric within a short period.

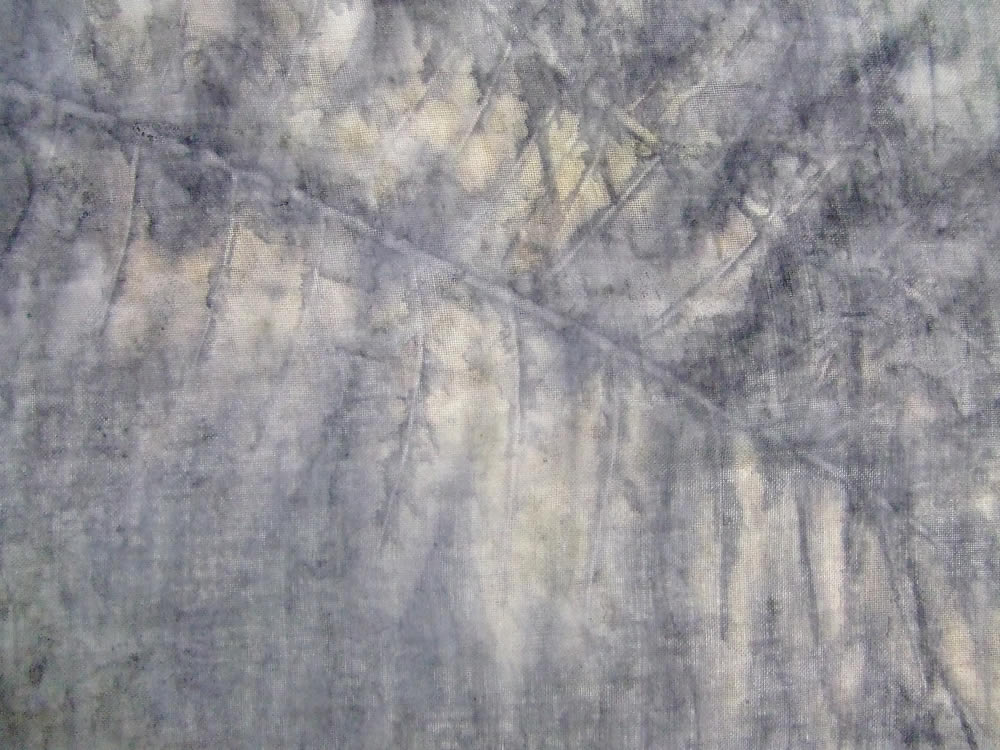
Each piece included rose and cotinus leaves for design continuity, plus a third type of vegetation for variety. These included sycamore seeds, eucalyptus, short-fruited willowherb, maple leaves, dock leaves and flowers and cranesbill leaves.

Daisy made the dress herself, and I think you’ll agree she did an amazing job. The silk was incredibly lightweight, and I wondered if she would have problems sewing it, but she said it was quite easy in the end.

mary wedding dress 1 mary wedding dress 2 mary wedding dress 3

As Mary was very interested in the process, I made her a small book as a keepsake. The front and back covers were covered with the cotton fabric dipped in iron solution that I used during the printing, and five internal pockets included some of the printed samples, dried sycamore seeds and a carefully wrapped rusty nail used to create the iron solution! I adorned the front cover with some more sycamore seeds stitched together.

hand made book hand made book

So despite my initial trepidation, this was a wonderful creative collaboration to be part of. Mary was a beautiful bride, and both Daisy and I are proud – and relieved. 😉

Foiling workshop

On Saturday I spent an enjoyable morning doing a foiling workshop with Anna Jackson of Black Cactus London. Anna is a screen printer and fellow Makerhood member, and she uses lots of leaves and textures in her work – so you can see why I’m a fan!

foil anna work

I bought one of her lovely foiled keypots (above) at Christmas, and I couldn’t turn down the chance to have a go at foiling myself.

We started by making a quick paper stencil to get familiar with the technique. Although we used a screen to push the glue through the stencil, Anna emphasised that this wasn’t essential – you can brush the glue on instead.

foil first stencil

Then we moved on to experimenting ourselves. Of course I spent most of the time using leaves and seeds!

Maple leaves
Maple leaves
Sycamore seeds
Sycamore seeds
Fig leaf
Fig leaf

I finished off with another more elaborate snail shell stencil.

foil last stencil

And here’s the happy group (including Kes of Heart in Art Workshops) showing off our work at the end.

foil workshop crop

Anna’s next foiling workshops are on 14 August and 3 September – a great way in to the metallic trend this summer!

Sneak preview of ecoprinting project

I’m currently working on a very special ecoprinting project, the details of which I can’t reveal yet.

But it’s meant I’ve been spending time experimenting and sampling, and I can’t resist showing you some of the results. I’m particularly pleased with some of the prints given by garden weeds, most of which I never knew the name of. I now have to stop ESP from weeding the garden! 😉

The photos below include rose and cotinus leaves as unifying elements, each combined with a different plant.

rose cotinus and rosebay willow
Rose and cotinus leaves with garden weed
Dock flowers
Rose and cotinus leaves with dock flowers
Sycamore seeds
Sycamore seeds
Cranesbill leaves
Cranesbill leaves

The sampling has led to some other new discoveries, like this vibrant green print from Robinia pseudoacacia.

robinia pseudoacacia

The colour didn’t really fit in with the project, but I’ve used the leaves with sycamore seeds and dock flowers on a scarf now in my Etsy shop.

ecoprint-robbinia-sycamore-2 ecoprint-robbinia-sycamore-3

And here are some other samples that I won’t be using in this project but may use in future.

Pelargonium flowers
Pelargonium flowers
Fig leaf
Fig leaf
ecoprint heuchera
Heuchera leaf

Starting with Photoshop

A few months ago I mused about whether I should learn how to use Photoshop so that I could get some of my designs digitally printed rather than making everything by hand. This would enable me to make larger pieces at more acceptable prices.

This week I finally got round to doing a two-day class on Photoshop for beginners at Morley College. It was a very popular class, with most of the participants wanting to learn Photoshop to improve their photos or restore old prints. And it turned out that I already knew the tutor, Estelle Vincent, as we had been located next to each other at Lambeth Open at the Portico Gallery a few years ago. Small world! 🙂

We covered a lot in two days, but what was most useful for me was learning about layers, filters and flipping/rotating to produce repeat patterns. Here are some of the patterns I created.

The first was a section of an ecoprint of eucalyptus on silk.

Original ecoprint of eucalyptus on silk

After changing the colour with a filter and flipping and rotating:

Repeat pattern created with filter

A similar process starting with a section of sycamore ecoprint:

photoshop-sycamore-before photoshop-sycamore-blue-repeat

Then I experimented with some indigo shibori. I didn’t bother changing the colours with filters this time.

photoshop-swirls-beforephotoshop-shibori-swirls

photoshop-kuno-before photoshop-new-kuno

It’s fascinating to see how different the patterns look when repeated on a larger scale, which is something I could never achieve by hand. And using different filters to create different colourways adds even more potential.

Lots for me to think about here!

How to rub a fish

One of the most unlikely titles for a post is actually the title of a booklet written by Eleanor Morgan, currently artist in residence at the Grant Museum of Zoology, part of University College London (my alma mater).

how to rub a fish

I attended a workshop run by Eleanor last night on the art of fish rubbing, or gyotaku as it is known in Japanese. As obscure as it sounds, the workshop was ludicrously popular (I only managed to get a place – or plaice!) because someone cancelled.

I became interested in gyotaku a few years ago, when I entered a competition to win a trip to Japan by submitting a blog about why I wanted to go there – gyotaku was one of the reasons. The technique originated in the early 19th century so that fishermen could record the size of their catch in the days before photography.

I thought I would have to go to Japan to witness this esoteric technique, but in fact I had a go at the Slow Fish stand at the Salone del Gusto in Turin last year. Because Slow Fish is all about sustainability, they had made flexible moulds from real fish and were offering the public the chance to print one on a tote bag. As you can see, my attempt was not entirely successful – though that’s probably more about my technique than the rubber fish!

gyotaku slow fish

Last night we used real fish – and printed with squid ink, so the fish could be eaten afterwards! 🙂

Essentially you rub the ink onto the fish and then place the paper on top, rubbing it against the surface to pick up the detail. It works better with scaly fish that have some texture, rather than smooth fish such as mackerel. The paper also needs to be thin but strong – Japanese paper is ideal because the longer fibres make it stronger.

gyotaku demonstration
Gyotaku demonstration

After the demonstration we had a go ourselves, first using tissue paper and then Japanese paper.

gyotaku1
Small ladyfish printed on tissue paper
gyotaku2
Dover sole on tissue paper
gyotaku3
Dover sole on Japanese paper

Then Eleanor demonstrated a slightly different method for squid and octopus, placing the inked-up fish down on the paper rather than vice versa. And Sam Curtis from the Centre for Innovative and Radical Fishmongery (yes, really!) showed us how to gut an octopus.

Here’s my first attempt at printing a squid using the fish down method:

gyoatku4

Previously I’d applied the ink with a dauber (a ball of stuffed muslin), but this time I use a brush, and I really like the visual brush strokes that show on the smooth skin of the squid – they seem to add a sense of movement.

I re-inked the squid and tried a print with the fish-up method (putting Japanese paper on top of the squid). The paper is so thin that you can see the squid beautifully through it:

gyotaku5
Inked up squid underneath Japanese paper
gyotaku6
Squid print on Japanese paper

Then I took another print on tissue paper without re-inking the squid. This gave a fainter, more ghostly print:

gyotaku7
Second squid print on tissue paper

All in all, a fantastically fun evening, although my dining room now smells very fishy, due to the squid ink!

Luckily, Brixton is not short of fishmongers, so future experimentation is on the cards.  🙂

Ecoprinting with mordants and natural dyes

Feast or famine: I haven’t posted for a while, so today you’re getting a long photo-heavy post! All the garments featured are upcycled, bought from charity shops or auctions.

With most of the previous ecoprinting I’ve done I have not mordanted the fabric. I’ve used mostly silk and wool, which are protein fibres and tend to print OK if I bundle them with a piece of cloth soaked in iron. The vintage cream silk dress below, for example, was not mordanted in advance – I just used maple leaves and an iron “blanket”.

maple dress

So I extended this method to other silk garments that were already dyed different colours. The scarf below was a strong lime yellow, and I printed it with different geranium (cranesbill) leaves. I picked the leaves from the garden of lovely embroiderer Lucy Goffin, who makes beautiful bespoke structured garments and also runs the fantastic Marchants nursery with her husband Graham.

ecoprint geranium scarf

This is an orange silk skirt printed with maple leaves. The orange was quite dark, so the print is quite subtle.

ecoprint maple skirt orange 2 ecoprint maple skirt orange

And this was a pale pink silk blouse printed with larger maple leaves.

ecoprint maple pink blouseecoprint maple pink blouse 2

Just as experiment, I also printed an unmordanted yellow cotton T-shirt with sycamore leaves. As well as the shape of the leaves, I love the shapes produced by the long stalks – so you will see quite a few sycamores featuring below!

ecoprint yellow sycamore tshirtecoprint yellow sycamore tshirt 2

I then mordanted a batch of garments with alum, and dyed them with natural dyes before ecoprinting on top.

This is a cotton apron dyed with oak leaves and printed with sycamore leaves.

ecoprint apron

This T-shirt was dyed in the oak leaves after the apron, so it was a paler brown, before printing with maple leaves. The maple leaves were quite thick and waxy, so they seem to have acted more like resists than printing themselves. You can also see very clearly the effect of using an iron blanket, as I mistakenly forgot to include it in one part of the bundle! I may have to overprint this with something else.

ecoprint maple tshirt ecoprint maple tshirt2

Finally, it was back to silk. Here’s a silk top dyed with onion skins and printed with sycamore leaves.

ecoprint onion sycamore ecoprint onion sycamore2

Another silk top dyed with pomegranate and printed with sycamore leaves. Both the onion skins and the pomegranate gave very similar golden yellows after dyeing (sorry – forgot to take any photos), but I simmered the pomegranate bundle with the sycamore leaves for less time, so it’s brighter.

ecoprint pomegranate sycamore ecoprint pomegranate sycamore2

The cotton apron picked up more details from the leaves than the cotton T-shirts, and the silk was even better, perhaps due to the relative thickness of the fabric?So many combinations and permutations to try!


Autumn ecoprinting

I haven’t done that much ecoprinting since the workshop in May with Irit Dulman. But with the autumnal colours all around, it seems seasonally appropriate somehow. And maybe it’s due to a different proportion of leaf pigments at this time of year, or maybe my technique is improving, but I seem to be getting more consistent results now. It’s probably a bit of both! 😉

sumac leaves

My sister Woman of the Cloth Carol came round last week with a large bag of sumac leaves (Rhus typhina), from the tree she is lucky enough to have growing in her front garden. The colours were glorious in their own right, but the leaves also contain a lot of tannin, which gives good prints.

I started by overprinting a couple of “failed” silk scarves from earlier experiments. On the first I used sumac and oak leaves, with a bit of logwood in the dyebath.

sumac scarf sumac scarf2 sumac scarf3

On the second I used eucalyptus, with a bit of cochineal.

eucalyptus scarf2eucalyptus scarf

I also printed a failed cotton scarf with sumac and maple – the prints here were more subtle.

sumac cotton scarf sumac cotton scarf2 sumac cotton scarf3

Back to silk, this was a vintage silk dress I found in a binliner of fabric scraps given to me by a friend who was clearing out her mother’s house after she died. I used three different types of maple leaf on this – they came out beautifully.

maple dress maple dress2 maple dress3 maple dress4

Finally, I made some hand felted berets and tried printing on those. Here are the results with sumac and maple.

sumac beretmaple beret

All these pieces used an iron mordant.

Ecoprinting with eucalyptus

My neighbour Len three doors down has a very large eucalyptus tree in his garden. I kept meaning to ask if I could go and “prune” some cuttings, but I don’t see him very often (it’s like that in London!).

But I came home one day a few months ago to find a landscape gardener’s truck parked on the road filled with various branches and cuttings, including eucalyptus! There was no-one around to ask (it was lunchtime), so I salvaged an armful of eucalyptus – and it’s been sitting on my front porch ever since.

For those of you who have never done any ecoprinting, eucalyptus is one of the easiest plants to work with. It doesn’t need a mordant, prints on pretty much anything (including plastic!), and, as a bonus, fills the house with a lovely smell while “cooking”. 🙂

So last week I finally got round to using some of it for ecoprinting. I started with a cream wool scarf, which gave some very strong prints.

scarf with eucalyptus ecoprints

As they were so strong, I wondered whether the prints would still show if I overdyed with indigo. I hummed and ha-ed and took a mini straw poll on Instagram, where there was a slight majority in favour of leaving it as it was.

But I tested the indigo vat after the dyeing session with Carol and it seemed to be fairly weak. So I overdyed. 🙂

eucalyptus ecoprint overdyed with indigo

I’d tested the vat on cotton, and it came out fairly light blue, but the wool scarf clearly took the colour much better, so the scarf is darker than I expected. But the prints still show through.

I also printed a couple of raw silk scarves. Because the fabric is much lighter, textured and semi-transparent, I was quite disappointed when I initially unwrapped these, as the prints didn’t seem to be as strong. However, one of the things I learnt on Irit Dulman’s workshop is that you can’t tell what the final print looks like until the fabric is dry and ironed – and indeed, the print was stronger when the scarves were dry.

I’m still considering whether to overprint these with some different leaves treated with iron, but I may resist(!), given the indigo result.

As the eucalyptus worked so well on wool, I made a couple of felt vessels and printed these.

felt vessels ecoprinted with eucalyptus felt vessels ecoprinted with eucalyptus

I don’t think I will overdye these! 😉

Finally, in case you thought I was kidding about eucalyptus printing on plastic, here’s a picture of some of the plastic wrap I used to cover one of the scarves!

plastic ecoprinted with eucalyptus