Alice Fox – Leaf Stitching

More grovelling apologies for another review after an exhibition has closed, but I only managed to see Leaf Stitching by Alice Fox at the SDC Gallery on its last day (last Saturday).

Alice Fox stitched oak leaves

I’ve followed Alice’s blog for a while (there’s a link to it in the left-hand column), fascinated by her experiments with rust dyeing and their ability to evoke a sense of place. She had some of her rust prints in the gallery, including some of her Tide Marks series and Pavement Pieces based on found objects, but the main emphasis here was on her stitched leaves.

The window featured three hangings of stitched eucalyptus leaves, which Alice says stitch well and give off a lovely smell at the same time.

Alice Fox stitched eucalyptus

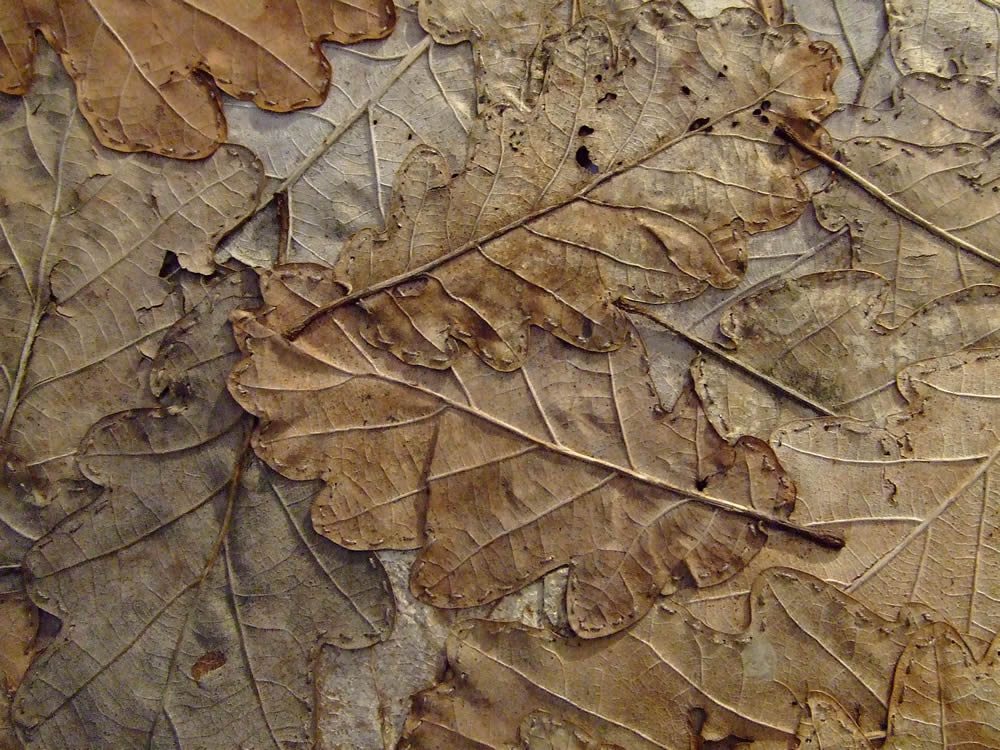
The colours of the eucalyptus contrasted with the oak leaf “quilt”, where the prominent leaf veins created more texture than colour (though the subtly different shades of brown were lovely).

Alice Fox oak quilt

Star of the show was a series of leaf cubes, arranged in a colour circle – a triumph of delicate geometry.

alice fox leaf cubesalice fox leaf cubes

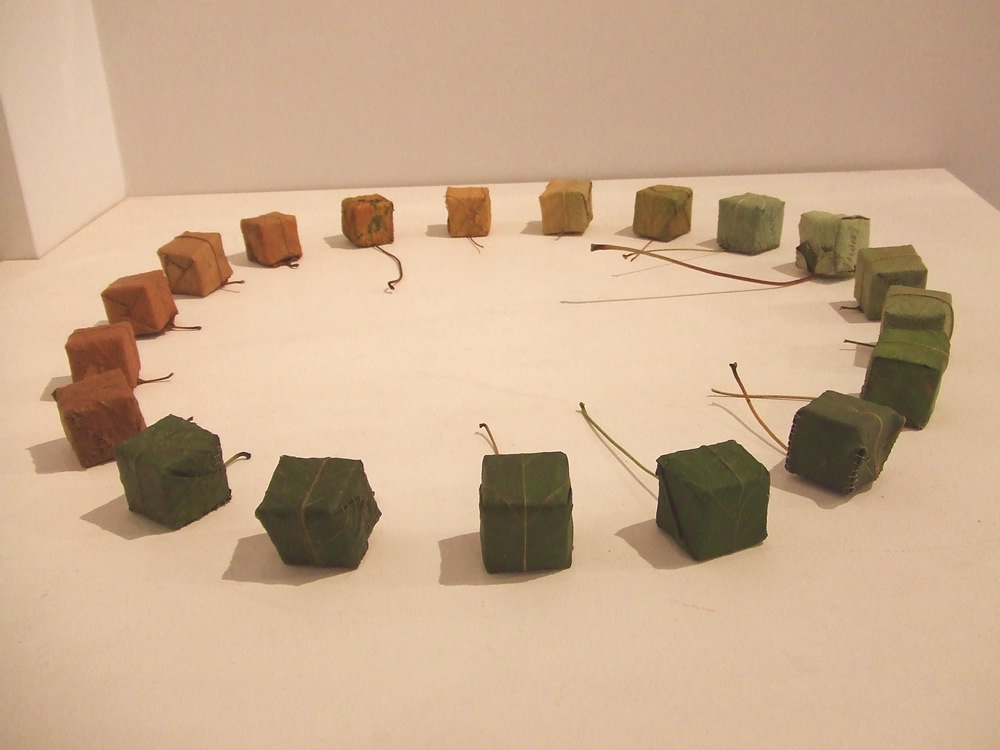
Alice hadn’t preserved the leaves in any way and is up front about the ephemeral nature of this work: “As stitched objects they won’t remain the same forever, although once dried out, and if stored carefully, there is no reason why they won’t stay the same for a good long time. They were not originally intended as pieces to be kept or displayed. In recording them as photographs in a publication some of their ephemeral nature is overcome”.

In this she follows in the tradition of artists like Andy Goldsworthy who create fleeting moments of beauty in nature.

I couldn’t resist buying Alice’s book Natural Processes in Textile Art – a great source of information on using natural and found objects to create art.

alice fox book

And here is the first work in progress inspired by the book. It’s an ecoprint on paper folded into a small book, which I’ve started stitching into.

ecoprint stitch book ecoprint stitch book ecoprint stitch book ecoprint stitch book


Jeannie Avent set up and private view

Phew! It’s been a tiring couple of days setting up the Women of the Cloth show in the Jeannie Avent Gallery in East Dulwich. Last year we had four artists; this year we have seven (though two don’t take up much space).

avent2014avent 2014-2 avent 2014-3

Most of the setting up was done yesterday, but two of the artists brought their work in today. I was minding the gallery today and then we had the private view in the evening, so it’s been a long day!

Here are some pics of the work on show and the private view. We were very excited when Sarah Campbell tweeted that she’d like to come – and she bought one of Carol’s felt bags!

The exhibition continues until 15 April – open every day 10am-5pm. Details of workshops here.

More screenprinting with shibori

Yesterday at Morley College I continued with some of the experiments I started at the end of last term, printing with an open screen on fabric that had been stitched, pleated, or folded in some way, based on shibori techniques. I wanted to try some different resist methods as well as experimenting with two colours.

First, I repeated the pleating method I used last term, but with two colours. I started with pale blue and when it had dried shifted the pleats a bit (I also restitched a couple of lines) before overprinting in red. The red wasn’t quite the colour I had in mind: I wanted a deep scarlet, but it turned out more of a claret. Great if you’re a fan of Aston Villa or West Ham, I suppose:

Next up was a piece of linen stitched with circles of different sizes, with the threads pulled tight and tied off. Some of the “puffs” were above the fabric; others were below:

Here’s the result after printing the first colour:

Then I stitched some more circles and printed with a second colour:

I also tried using a piece of cartridge paper as a resist, cutting slits and pulling sections of fabric through. It looked a bit like a mushroom farm:

I did this twice with different colours, but there were still huge gaps. I need to make the slits closer together, repeat it more times, or pull more fabric through:

Then I repeated the pleating experiment but with far more lines of stitching much closer together. I decided to use only one colour on this from the outset, so I chose the darker blue. I love the marks this has created, and I think the red thread I used for the stitching looks really effective, so I’ll probably leave it in rather than removing it:

Finally, as the indigo vat was charged up, I also did a more conventional piece of stitched shibori dyed with indigo:

Quite a busy day, then – no wonder I was completely exhausted when I got home!

Origin

I was lucky enough to win a ticket, courtesy of Liberty, to the private view last night of Origin, the contemporary craft fair organised by the Crafts Council. It was a wonderful collection of 200 makers from every discipline – and a glass of something bubbly and delicious canapés helped things along!

There did seem to be an awful lot of jewellery (I’m not really a jewellery person, much to ESP’s relief!), but naturally I was mostly drawn to the textiles, though there were some fascinating lighting displays as well. Favourites below.

I’ve mentioned Michelle Griffiths before, so it was great to meet her in person. Her pure, pollen-inspired forms are rooted in shibori techniques of stitching and pleating, but she does use dye as well. She showed me a beautiful indigo shibori piece with a pattern based on a spectogram of a blackbird’s song. And she also makes lovely heat-set “bubble wrap”.

More shibori – Anne Selby makes the most amazing sculptural pleated scarves using the arashi shibori method. This is not just pleating – it’s double pleating and layering, steaming, discharging and redyeing that produces such exquisite pieces.

Johannes Hemann, storm series from Victor Hunt on Vimeo.

And now for something completely different. Johannes Hermann‘s “Storm Series” consists of lamp shades and other objects that look like organic crystal growths. He makes them by using a fan to blow granules of styrofoam or other light plastic around a heated box. The combination of heat and wind causes the granules to clump together. Fascinating!

I guess you could call Jasmin Giles‘ work jewellery, but it’s more like wearable art. She combines knitting with glass, wax and resin to create bold statement pieces. Not something you’d probably wear to the office, but certainly wonderfully eye catching.

Joanne Bowles works in metal and ceramics – her work has a very Japanese feel. I love the contrast between the linear ridges of the metal basket and the smooth translucence of the bowl.

Gill Wilson works with paper, forming pulp into large-scale multi-layered geometric structures encased in clear perspex cases. Like Michelle Griffiths, she has trained in Japan, and some of that aesthetic purity comes through here.

Rachel Gornall combines layers, colour and stitch to produce textile artworks that remind me of stained glass windows – beautiful!

Finally, Claudia Phipps works in real glass. She was exhibiting glass wings, based on patterns from dragonflies and lacewings, cutting the holes using waterjets. It’s inspired me to think about felting a scarf in a similar shape.

Origin is on from 22 to 28 September, at Old Spitalfields Market, London E1 6EW, 11am-7pm. Admission £10.

Shibori cushion

I’ve finally started turning some of my shibori samples into useful items. The first is a cushion.

I think that the intermediate stages of producing shibori – stitching and pleating – actually look  very attractive in themselves, so the photos below show each different step in producing the cushion cover.

Stitched semicircles on folded calico
Calico after pulling all the threads tight and securing
Other side of the calico after pulling the threads tight
After dyeing with indigo and unpicking the stitches
The finished cushion!
Close-up detail of shibori circle


Starting real shibori

Last night in class we started experimenting with shibori dyeing, using cotton muslin and indigo. The indigo was already mixed up in a big plastic vat with a lid – which is important to keep on, as indigo oxidises on contact with air, turning from green to blue. You can see this when you take your cloth out of the vat – it’s actually green at first, turning blue in front of your eyes!

The indigo is mixed with various chemicals to help fix it, including caustic soda (though our tutor, Debby, assured us that it is at such a low concentration it doesn’t damage the skin). Despite this, indigo does apparently tend to run – rather like jeans when you wash them.

Essentially, shibori entails using various types of resist to prevent the dye reaching the cloth, so it’s a negative process – in our case the marks were white against the dyed blue cloth. You can use pretty much anything – string, thread or elastic bands, stitching pulled up tight, clamps or bulldog clips, wooden or plastic blocks – to block the dye from the cloth. You can also pleat the cloth or roll it around rope,  ruler or plastic tubing, or tie items like stones into it. The world is your oyster!

When using indigo it’s important to remember to wet the cloth before putting it in the dye to prevent the indigo “wicking” through into the dry cloth inside – run it under the tap until it’s thoroughly soaked and then squeeze out excess water to avoid diluting the indigo too much.

Below are some photos of some of my experimental results, with notes on what I did. I’ve brought some muslin home to do some more elaborate stitching patterns for next week, as they can be too time consuming to do in class.

Above – I put a piece of string along one side of the cloth and rolled the cloth around it like a swiss roll. Then I pushed the ends of the cloth towards the centre so that it was all scrunched up and tied the ends of the string together. As you can see, not much dye penetrated the inside of the cloth, but the edges have a nice honeycomb effect. Debby says that a thicker piece of rope is more effective, so I’ll try that next time.

Above – I pleated the cloth in concertina folds and then wrapped several rubber bands around it. Again, the edges look nice, but not much dye penetrated the inside. Perhaps fewer rubber bands would leave more space for the dye to soak between. Or irregular pleats that expose more cloth to the dye.

This was the most time-consuming sample I did. I marked out a grid of pencil dots on the cloth, then pinched the cloth at each point and tied a thread around it. This was a bit fiddly – but it was even more fiddly trying to remove the thread without cutting into the cloth after dyeing. I was wearing latex gloves when handling the dyed cloth to try to avoid turning my hands blue – but it was impossible to wear gloves while removing the thread!

However, I think the results are worth it. I really like the creases and pinched tips that remain in the fabric even when it’s dry, though I suppose they could be ironed out. They remind me of shells on a beach.

Finally, my least successful experiment – I did this in a hurry at the end of class! I folded  the cloth diagonally into eighths and clamped it – but the indigo dyed pretty much only the outside (and didn’t even get through to the other side of the cloth). I guess it might make an interesting flag!