Twisting and interlocking

My fascination with Möbius strips continues. Although the first triple-twist loop I made was rather small, I have a friend with very slim wrists, so it proved to be the perfect birthday gift!

I then went on to make a slightly larger version, this time wrapping with paper yarn, which produced a much stiffer piece than wrapping with wool.

triple mobius loop

Some of the yarn I dyed with indigo and onion skins.

triple mobius loop

What next? Obviously it was time to try interlocking Möbius strips (but with only one twist in each!). 😉

I did a paper mock up of how this might look.

interlocking paper mobius strips

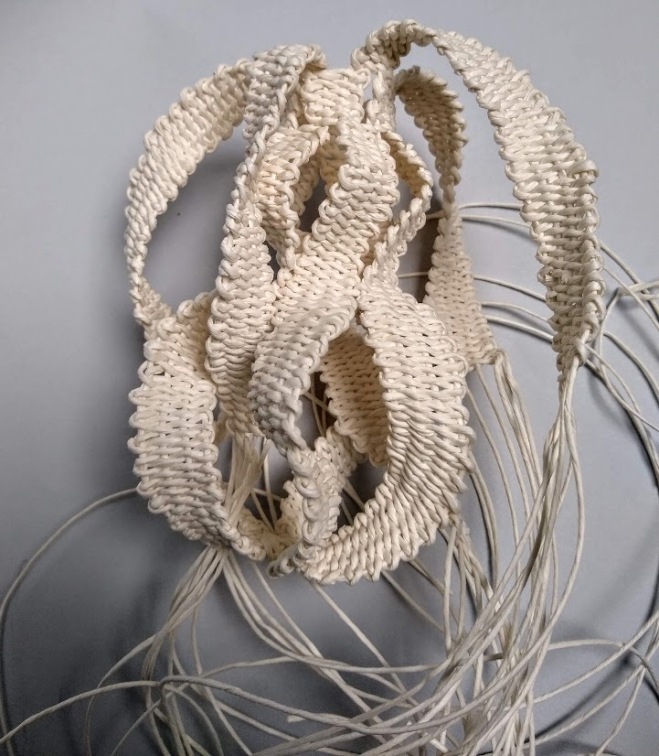
Then I set to work. Previously I had used both wire and paper yarn as the core, but I now decided to try using wire on its own.

interlocking mobius wip

However, without the paper yarn, the wire on its own provided less grip for the wrapping, which tended to slip more. The piece also had less body. So I went back to including paper yarn in the core.

interlocking mobius wip

I also found that the initial slippier core meant that the parts of the strips that were supposed to be flat started to curl over at the edges. (This was probably also caused by too much tension when wrapping on my part.) Although this was not intentional, I actually liked the increased movement caused by the curling, so I didn’t try to correct it.

interlocking mobius

As a result, the final piece of interlocking Mobius strips doesn’t look anything like the paper mock up! But I’m OK with that.

interlocking mobius strips

And now for something completely different – well, almost

A couple of months ago I signed up for an online course with Australian basketmaker Catriona Pollard. The course was on making sculptural basketry with found wood, as I was really interested in finding out how to incorporate found objects such as wood into my work.

However, finding suitable pieces of wood was a bit tricky in the middle of London in August. There were alternatives I considered, but in the end I just started on the sculptural part, which involves twining.

I soon found out that twining with paper yarn produces a satisfying (for me) twist. So I’ve decided to go ahead without the wood for now and see what happens.

sculptural twining

I have no plan for this – I just decided to start with five “arms”, like a starfish, and see how it developed. Sometimes they come together, sometimes they wind over or under each other, depending on how I feel. At the moment it’s fairly symmetrical, though it may not look like that in the photo.

Although twining is a different technique from coiling, I’m enjoying exploring how to achieve similar twisting and interlocking effects. Let’s see how it goes!

Lockdown week 8

I said last week that I would post more information about the coiling project I’m working on for my City Lit basketry course. The original deadline to finish was today, but because the course is currently on hold, the deadline has been extended indefinitely. Just as well, because I haven’t finished yet! 🙂

I’ve been working on the project in fits and starts over the past eight weeks. There’s been a lot of sampling to get the effect I want, but I think I’ve finally nailed down the materials and techniques to use.

The theme of the project is animal markings. From the start, perhaps leading on from the pattern on the cane platter I made, I was attracted to the radiated tortoise (Astrochelys radiata) and Indian star tortoise (Geochelone elegans). Both are endangered species.

Radiated tortoise

Indian star tortoise

It’s not just the pattern – it’s the domed form of the individual parts of the shell (called scutes) that appeals. My plan was to make several individual units and then join them together to create the shell.

Looking at the shapes of the individual scutes, I could see that the central ones were hexagonal, while those at the edge had five or four sides.

I made the first samples with raffia, both with a wrapped core and an exposed core. I decided I really don’t like wrapping with raffia – it always seems to fray, and it feels quite plasticky. Shame, because raffia comes from Madagascar, like the radiated tortoise!

I liked the idea of an exposed core evoking the concentric ridges of a tortoise shell, but it was tricky getting a defined pattern this way.

I also toyed with the idea of creating a more openwork shell, to represent the fragility of such an endangered species. But this came out more domed than conical – more like a jellyfish – so although I loved the effect I decided to put that in the box labelled “Ideas to pursue later”.

Then I moved onto working with a solid core, using sash cord wrapped with knitting yarn. The pattern here was very distinct, and though this started as a sample I couldn’t help myself and carried on to make a complete bowl (as reported in Lockdown week 3).

The scale of this was too large for my tortoise (unless I swapped to a giant tortoise!), so I replaced the core with thinner string plus copper wire (to help shape the pieces) and started experimenting with different wrapping materials – soft string, fine hemp, linen thread.

In the end, I concluded that the finest pattern was obtained using linen thread (shown in the sample at the back in the photo above). The wire in the core enabled me to shape it into a hexagon.

Next was the problem of how to join the individual units. The first samples I made had no border, so the edges were a mixture of black and neutral stripes.

I tried joining them together with figure of eight stitch in neutral thread, but this looked messy against the black. Overstitching was less messy but somehow too intrusive.

So I made more samples with the outermost round entirely in neutral-coloured thread, and joined these with figure of eight stitch, which was much neater.

I then joined all the samples I had made together to test out how an overall border, enclosing them all, would work.

The joining on these samples isn’t very neat, for the reasons explained above. But I learned two things from joining them all together.

  • The overall border will undulate because the angles where the individual scutes meet is not sharp. I don’t mind that – in fact, I think it adds more movement and fluidity.
  • With three central hexagonal scutes (as in the page from my sketchbook above), the overall shape would be disproportionately long and thin. So the final piece will have only two central hexagons. This will mean making 10 individual units rather than 13.

Phew! Just have to make it now. And as I envisage this being the lid of a box, there’s still all the planning to make that work. More to come!


Making a coiled sycamore seed

In a previous post I mentioned a course on coiled basketry I was taking with Polly Pollock at City Lit and described the different samples I had made.

The second half of the course focused on our own personal projects, developing the techniques we had learned to produce a piece or series of samples inspired by the seedpod theme.

My inspiration actually came from a piece of driftwood.

driftwood

It reminded me of a sycamore (US: maple) seed, so I thought I would try to weave something around it to create the “wings”.

At first I tried wrapped linear coiling with paper yarn, but it felt too solid and heavy – this was supposed to represent a floating, spinning seed.

linear coiling

So then I tried a more open weave approach, using blanket stitch with cordage, still with paper yarn. This worked better but was a bit too large.

sycamore seed sample

I tried changing materials, using a thinner cordage and enamelled wire for the blanket stitch. This was much better!

sycamore seed wire sample

There was still more experimenting to be done with varying the tension of the stitch to evoke the marks and form of the seed, but I finally got started.

sycamore seed wip

Finally, the finished piece:

sycamore seed

As ever, it was fascinating to see the very different pieces that everyone produced. I don’t have permission to post photos of others’ work, so you’ll have to take my word for it! But it was a fantastic course and I would highly recommend it.

There is also an exhibition coming up of work by students who are completing the two-year City Lit diploma in basketry. It’s at the Espacio Gallery in London from 23 to 28 July. I’ve seen some of the work on Instagram and it looks well worth a visit!

Different materials, different result

I seem to be getting more obsessed with basketry at the moment – I’m currently doing an eight-week course (one day a week) on coiled basketry with Polly Pollock at City Lit.

The first four weeks have been spent exploring different ways of starting baskets and working with different materials and stitches. In the second half of the course we are expected to work on our own projects around the theme of seedpods. So as you can imagine, this suits me down to the ground! 🙂

So far I’ve experimented with colour:

raffia coiled with hemp
Raffia coiled with hemp

With softer and harder materials:

fabric coiled with paper yarn
Fabric coiled with paper yarn

seagrass coiled with paper yarn
Seagrass coiled with paper yarn

With additions:

seagrass coiling with hare barley additions
Seagrass coiling with hare barley additions

And combining with felt:

coiling with felt
Coiling with felt

I also tried some “linear” coiling – creating rows rather than spiralling from the centre. The first sample I made with this technique had a thick core, which I wrapped with a stiff paper yarn. As I progressed, the piece began to twist quite spontaneously.

twisted coiled piece
Twisted coiling

I made similar pieces with the same core material but different wrapping fibres, which were all softer than the paper yarn. Some of these pieces twisted a little, others hardly at all.

I also tried making a piece with “ribs” to give a more defined form. I bound five lengths of seagrass together and coiled a thinner piece of green seagrass around them using blanket stitch. Because the seagrass ribs were relatively soft, the tension of the stitching tended to twist them slightly to the right, which made the final piece look a little unbalanced.

As a felter, I am used to shaping a piece while fulling it – the final form can look very different from the original! So I thought I would try reshaping this piece to emphasise the twisting even further. The paper yarn is strong but flexible, so this worked out quite well.

twisted coiled seedpod

This week we were working with natural materials, so I repeated this form using strips of cordyline as the ribs, dried daffodil leaves as the core, and waxed polyester string for stitching.

The cordyline was much stiffer than the seagrass, and I found that if I pulled the ribs together at the top, the coiled sections between the ribs bulged outwards, producing a completely different shape.

coiled daffodil leaves

It’s a useful reminder of how you can achieve completely different results with different materials, and making samples is a very worthwhile exercise. 🙂

Plarn coiled bowl

I’ve written before about knitting and crocheting with plarn (plastic yarn). But you can also use plastic like any other yarn or fibre to make coiled baskets or bowls.  Cindy’s method of making plarn is best for this, as the joins are relatively smooth and you don’t get big knots sticking out (unless that’s the look you want).

The main problem with using plarn for coiling is that it’s quite fragile. It depends on how thick the plastic is, of course – the bags I used for the bowl in the photo above were very thin. If I pulled the plarn hard, it stretched; if I pulled even harder, it broke. But the wrapping needs to be quite firm, especially the wraps that join two coils together. So it takes a bit of practice.

I also found it easier if the strands of plarn are not too long. I joined two loops of plarn, started wrapping, and when I had nearly reached the end joined on another two loops. If it’s longer than this the plarn tends to get caught or tangled, and there was more risk of it being stretched or broken as I tried to untangle it.

The bowl I made is a bit ‘fluid’ in places (‘expressively organic’, I’d say!). But it was very satisfying to make, and I’m going to try some more.

Prism at the Mall Galleries

Today, on the recommendation of a fellow student, I went to the Mall Galleries to see Prism, an exhibition of textile-inspired art.

Maybe it’s all the work we’ve been doing in class on constructed 3D textiles, but the pieces that attracted me most were vessels or sculptures made by weaving, coiling or knitting.

Anita Bruce

Anita Bruce knits and crochets beautiful, delicate constructions from enamelled copper wire. Previous work has featured sea creatures and plankton, but here she was displaying deconstructed pieces of Unst lace, based on traditional Shetland knitting patterns.

Julieanne Long

Julieanne Long is also interested in natural forms and was showing some striking giant black and red basketry seed pods that incorporated cable ties and other found objects.

Mary Anne Morrison

Mary Anne Morrison‘s ‘Peelings’ are made from coiled and stitched textiles that circle around and in on themselves to produce their own dynamic.

Joan Richardson

Finally, Joan Richardson incorporates fabrics and other found objects into her pieces of knitted copper wire and paper string.

I must admit that when we started this term on weaving and basketry techniques I wasn’t entirely enthused. But earlier this week I had a go myself in class at knitting with very fine wire, and I loved the colours and delicacy of the result. As ever, a bit of lateral thinking and imagination when it comes to materials and techniques can be very inspiring.

Sample of knitted wire

PS I forgot to say that the Prism exhibition at the Mall Galleries closes tomorrow, so you have limited time if you want to see it!

Coiled baskets

Last week there were only five of us in class – a rare luxury (for the students) of lots of space and attention. Everyone ended up working on different techniques, such as knitting with paper strips cut from magazines and sewn together, or weaving strips of pelmet Vilene dyed in the heatpress.

I’d missed the previous week’s class because I was on holiday, so I decided to have a go at making a coiled basket. Essentially the principle is that you wrap strips of one material (in my case raffia, but you can use strips cut from plastic bags or fabric) around some kind of cord (sash cord is ideal, as it doesn’t fray, but it’s rather expensive, so I used nylon clothes line). As you wrap the cord, you also coil it around itself, and then on every fourth or fifth ‘wrap’ you thread the wrapper through the previous coil to bind the whole vessel together.

By coiling the cord around the outside of itself you produce a flat disc; if you want a 3D version, you coil it on top of the other coils. Indian and native American baskets are often made this way, using materials like split twigs and yucca fibres.

You can also produce ‘open’ structures by keeping the coils apart and binding them only occasionally where they come into contact. I decided to try both methods in a bowl with a flat bottom and open sides.

Work in progress - the bottom of the basket is closely coiled, while the sides are more open loops

Nearly there - I'm not sure how to finish it off!

Coiling is quite a slow process, so I took the basket home with me to do some more work on it. The problem is, I’m not quite sure how to finish it off, so at the moment I have a bit of the blue nylon washing line sticking out! I’ll have to ask my tutor on Wednesday.