So long

As explained previously, I will no longer be posting on this blog, but I am leaving it up as a record of my adventures in fibre art over the past 10 years. Thank you very much for keeping me company!

My new website is kimwinter.co.uk, with its own blog that you can subscribe to, so do pop over there if you want to see where the next phase of this journey goes.

July 2021 roundup

Although the first year of the two-year City Lit Creative Basketry course finished in June, I signed up to do a four-week contemporary willow basketry course afterwards, as we don’t work much with willow on the two-year course and it’s an area where I would like to be more proficient.

The tutor was Debbie Hall of Salix Arts, who was new to teaching at City Lit but has run her own workshops for many years. She very generously brought in some of her home grown coloured willow for us to use alongside the standard buff and Black Maul the college normally provides, which was great.

We all started by making a standard 3×3 base, and then went our own ways when weaving up the sides. I wanted to try zigzag weave, and Debbie suggested using two different colours to emphasise the pattern more. I also thought I would use a piece of found wood as a handle, as my previous experience of cranking willow to make a conventional handle was not very successful. However, attaching the wood handle was really hard work, which made me think that cranking was not so bad after all!

Here’s the result – you can see that the wrapping on the handle is not very even!

Most of the other students in the class opted to practise rope weaving, which I’ve previously attempted by myself from a video tutorial. So I thought I would have a go at herringbone weaving, which is like alternating rounds of twining and reverse twining with rope weaving.

I was concentrating so much on the technique that I failed to keep an eye on the shaping, so the final bowl was rather misshapen (which you can’t see in the photo). The base was quite small (about 12cm in diameter), so when I put the 5ft stakes in for the uprights they kept falling out. I ended up using 3ft willow for the stakes, which I had always thought would be too spindly, but it worked OK.

It’s made me think that I should experiment with some small scale willow work, which would definitely suit better the space I have available!

Exhibitions

It’s been a busy month for visiting exhibitions now that I’ve been double jabbed and keen to venture into the outside world again.

First there were the colours and textures of Sheila Hicks at the Alison Jacques Gallery – great Rothko-like bands of colour and bobbly comets.

Over at the Hayward Gallery, Igshaan Adams is not an artist I’d heard of, but his combination of weaving and sculpture, inspired by indigenous dance of the northern cape of South Africa, blew me away. Clouds of dust created by the kicking performers were evoked by spiralling constructions of wire and beads, while weavings laid on the floor represented the desire paths created by local residents as they walked around.

Finally, a friend offered me a spare ticket to the much sought-after Hockney exhibition at the Royal Academy. A previous exhibition here in 2012 featured his first works made using an iPad, mixed with his drawings made more conventionally, and I remember being quite intrigued at the time. This time all the works were made with an iPad, and what struck me was the limitation of digital mark making. Not only was everything very flat, but in many works the repetitiveness and regularity of the marks was very obvious – it often felt like digital potato printing. (We were not allowed to take photos, so there are no images.)

Maybe working with textiles, where texture and hand-made irregularities are such a feature, caused my indifference. Where the technology did come into its own was in the animations depicting streaming rain or showing the process of creating the work.

A word about the future

Finally, a heads-up about the future of this blog – you are the first to know!

As you may have noticed in the past couple of years, my focus is moving away from upcycling readymade items and more towards sculptural basketry. So in the next few weeks I will be launching a new website and phasing out Flextiles. I’m not sure yet whether the new site will have a blog, but I will post the link here when it’s ready.

I’ll be resurrecting my email newsletter (which has been dormant during the pandemic), so if you signed up previously under Flextiles you will continue to receive this (you can of course unsubscribe at any time).

This blog will remain open for people to read, and I’d like to thank everyone who has read, followed, liked, and commented over the years. It started out in January 2011 as a personal journal of what I was learning in my textiles evening classes, but more than 10 years later it’s become much more to me, creating connections with so many people around the globe who share a love of, and curiosity about, the world of textiles. Please do stay in touch during the next phase of this journey!

Kim x

Christiane Sand Award

You may remember this little guy I made over a year ago. It was during the first lockdown in April 2020, and we had just started the coiling module at City Lit, when everything closed down.

However, our tutor Polly Pollock continued to have regular weekly Zoom meetings with the group, giving us advice and feedback on our coiling projects, the theme of which was animal markings. My piece was inspired by the radiated tortoise, a critically endangered species from Madagascar.

Fast forward to April 2021, when our college classes resumed in person. We were all asked to bring in our coiled pieces and sketchbooks for assessment.

A few weeks later I heard that I had been one of two students awarded the Christiane Sand City Lit Award for Coiling.

Christiane Sand first enrolled on the City Lit Creative Basketry course in September 2011. After completing it she was diagnosed with cancer and re-enrolled in 2015 as a therapeutic pursuit alongside her cancer treatments. For her coiling project she made a wolf basket, which she found challenging but ultimately rewarding. This is what led her husband Nigel Grant to set up two awards for students who produce outstanding work in the coiling module.

As you can imagine, I’m well chuffed! The prize is Β£250 to be spent on a basketry course, which will allow me to keep feeding my habit. πŸ™‚

June 2021 roundup

A bit of a rush

June has been a bit of a rush – literally, for we started our rush module at City Lit. It’s an interesting material, quite spongy to work with, but surprisingly strong. And when it’s fresh it comes in all sorts of lovely shades of mottled green, brown, and yellow, but apparently over time it all fades to a straw colour.

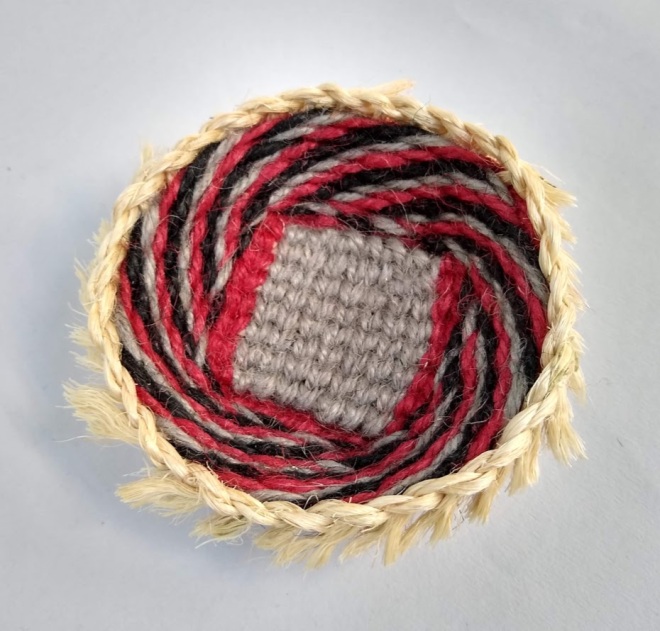
We started by making a mat with a classic rush construction: a square checkweave centre surrounded by twining, which makes it circular. The stakes are threaded away at the border, which can be a bit of struggle if the rush is thick, but it is surprisingly manoeuvrable with a rush threader (like a giant needle). At first I thought I would leave loops around the border, but then I changed my mind and pulled them all the way through!

rush mat 1rush mat 2

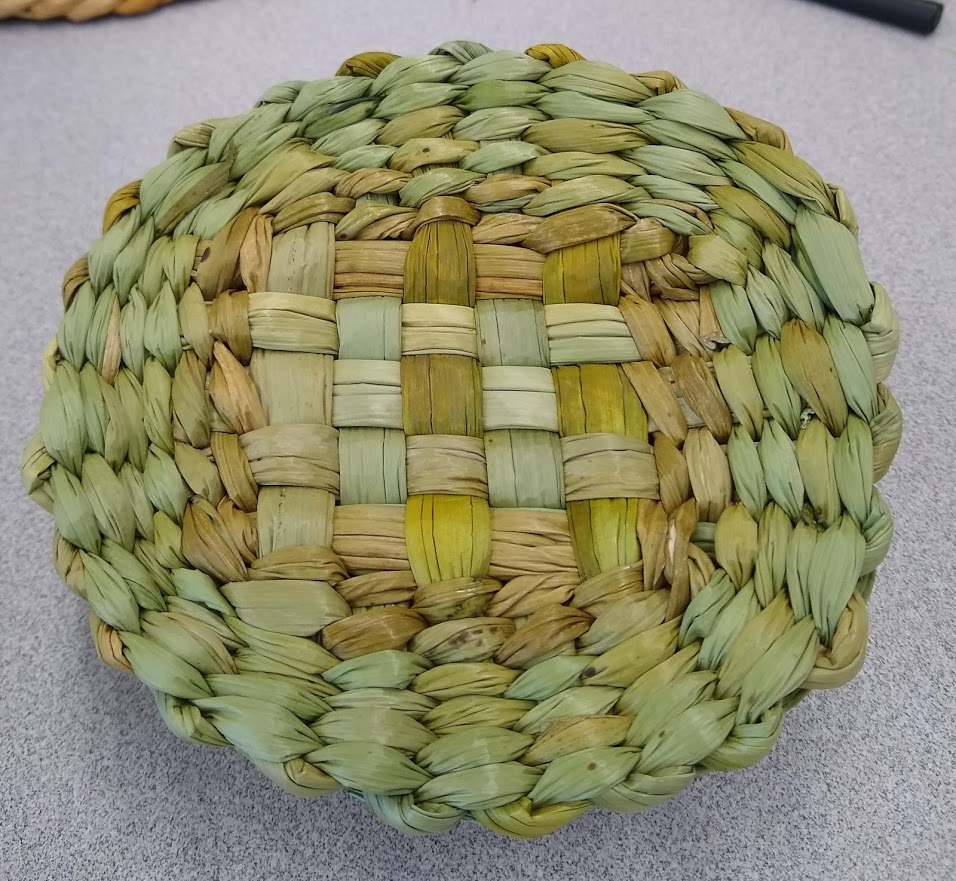
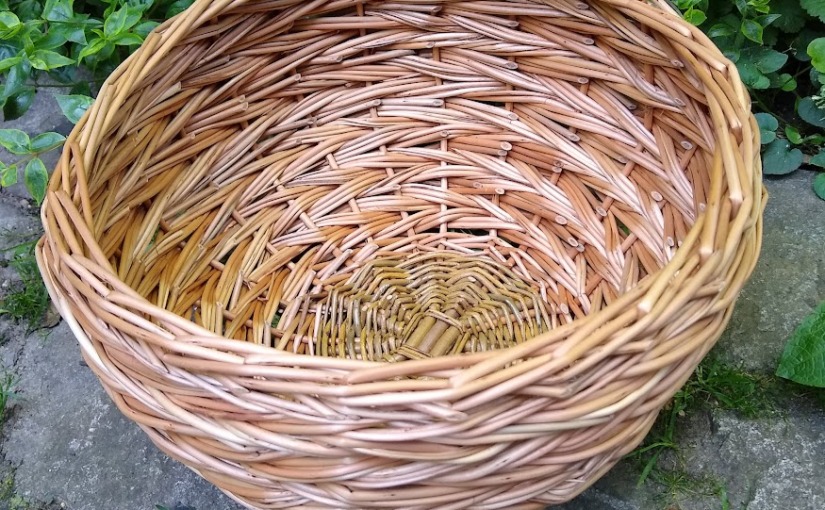
We then progressed on to making a bowl, using the same technique but shaped around a mould (another bowl). This is very important to create a regular shape, as you will find out later!

After that I spent some time experimenting with rush. There is a book called Textiles and Weaving Structures by Peter Collingwood, a weaver who analysed various woven textiles to see how they were constructed.

peter collingwood book

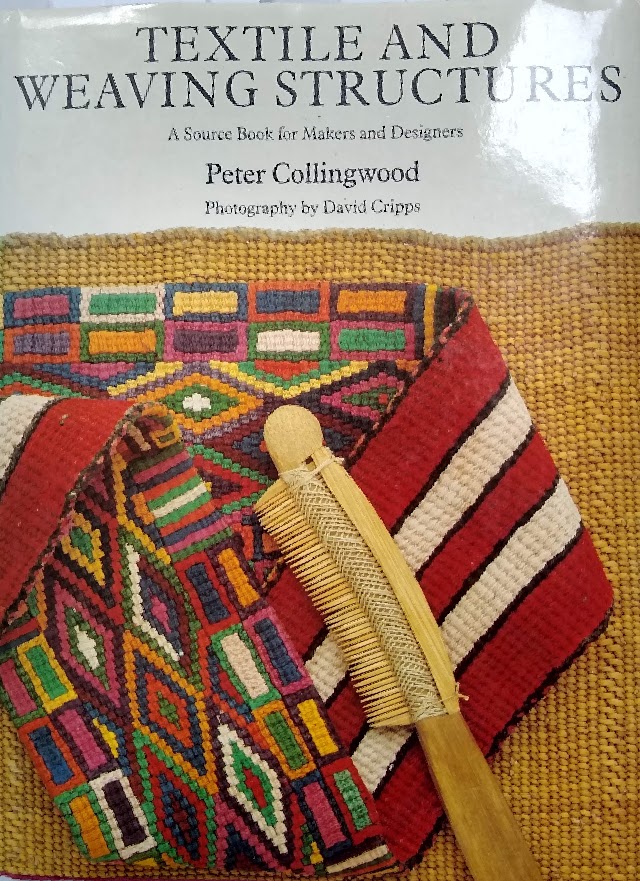
There are lots of fascinating insights into textiles from around the globe, including some that I thought could be adapted for rush.

They included this fan from India. The plaiting was fairly straightforward, but I found it tricky to keep the wrapping tight on the handle.

rush fan

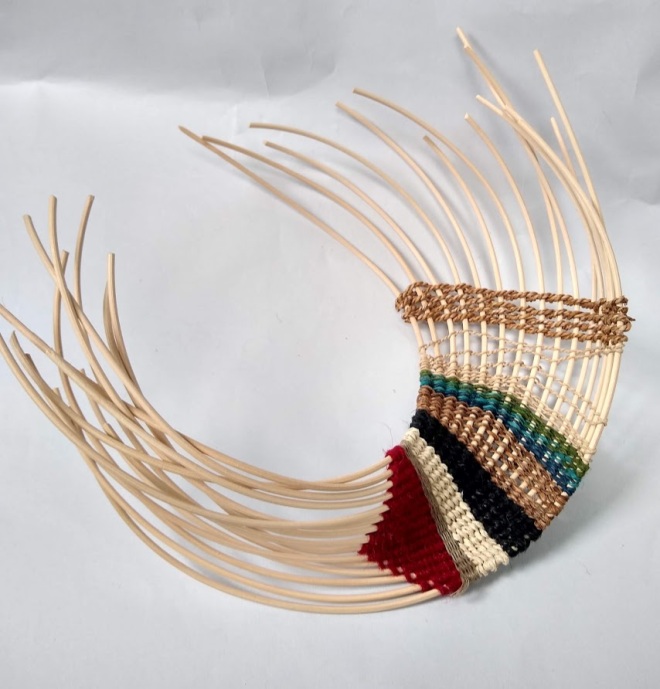
I also tried this intriguing sieve, which is woven flat and then opens out into a cone. It looks as if it will never work – but it does!

rush sieve

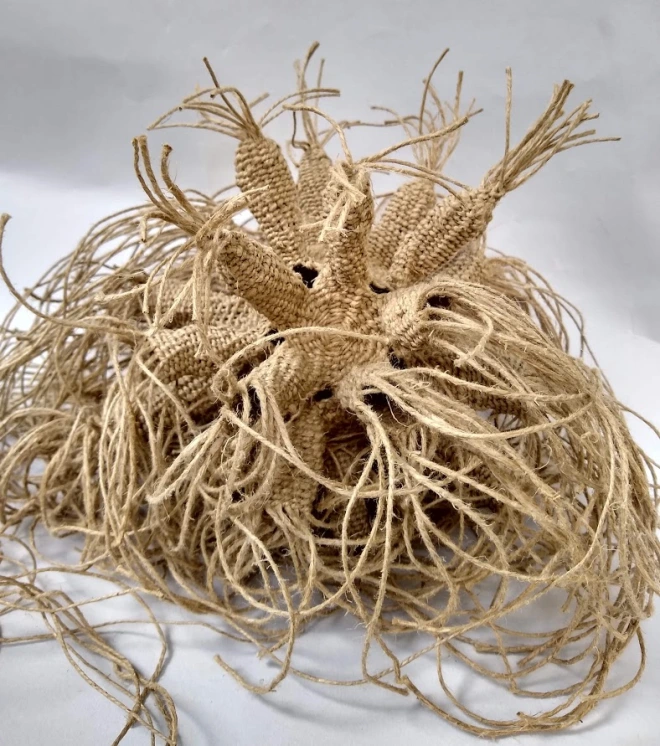
Finally, I had a go at weaving a spiral base, inspired by a Greek wastepaper basket. I never got any further because I ran out of time, but the concept has been proved!

rush spiral base

The Commons: Re-enchanting the World

Last month, Catherine Morland, an artist and former basketry student, contacted John Page, one of our City Lit tutors, about The Commons: Re-enchanting the World project. This highlights the complex histories of land ownership, gender rights, labour, and the wage economy as well the decline in communal life and subsistence living. She was looking for basketmakers to make bread basketsΒ  for the launch meal in September. The baskets will be displayed in the Museum of English Rural Life for a month and feature in a publication about the project.

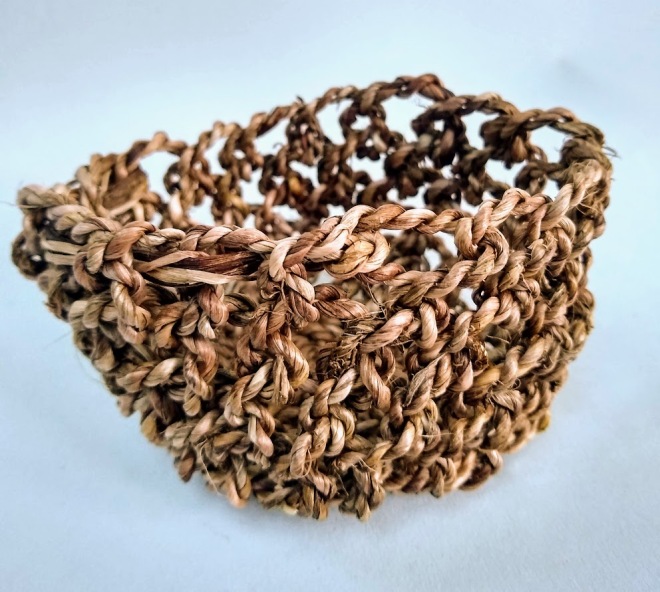
Jo, another City Lit student, and I, along with John, decided to make bread baskets for the project. Because the project was about common land and shared resources, I decided to use foraged materials, including cordyline leaves for the stakes, and cordage made from day lily leaves, daffodil leaves, and crocosmia leaves.

However, this was before we started the rush module and before I knew about the importance of using a mould to get a regular shape. As a result, the first one I made was terribly wonky. I couldn’t decide whether it was just charmingly rustic or simply crap – but after I made a second one around a mould I decided it was the latter!

The photo below shows theΒ  one made around a mould on the left and the one made without a mould on the right.

bread baskets

And here are all three bowls – John’s rush bowl is at the top, and Jo’s straw bowl is bottom left.

bread bowls x 3

Talking of foraging, it’s peak bindweed season at the moment, so I’ve been harvesting like mad, turning tangles of foliage into coils, ready to weave with.

Working with willow

After a long break, private workshops have started to resume, and I spent another very enjoyable day with Nicki Rowling of Willow and Yoga, making a tiffin bag. Because it has a wooden base, it’s quicker than if you have to make the base as well, and it’s very sturdy. It’s the perfect size for a phone, purse, sunglasses and bottle of water, and I love it!

tiffin bag

Nicki’s woodland studio is all off grid, with no electricity or running water, and compost toilets. It’s difficult to believe you’re just outside Dorking! πŸ™‚

I’ve also signed up for a short four-week course on contemporary willow basketry now that the first year of my City Lit creative basketry course has finished (having taken two years!). I’ll report back on that next month.

Holiday in Scotland

After months of being confined to barracks, ESP was climbing the walls, so we decided to sneak in a quick six days in Scotland between basketry classes. The weather was glorious, as was the scenery, and we even spotted seals off the coast.

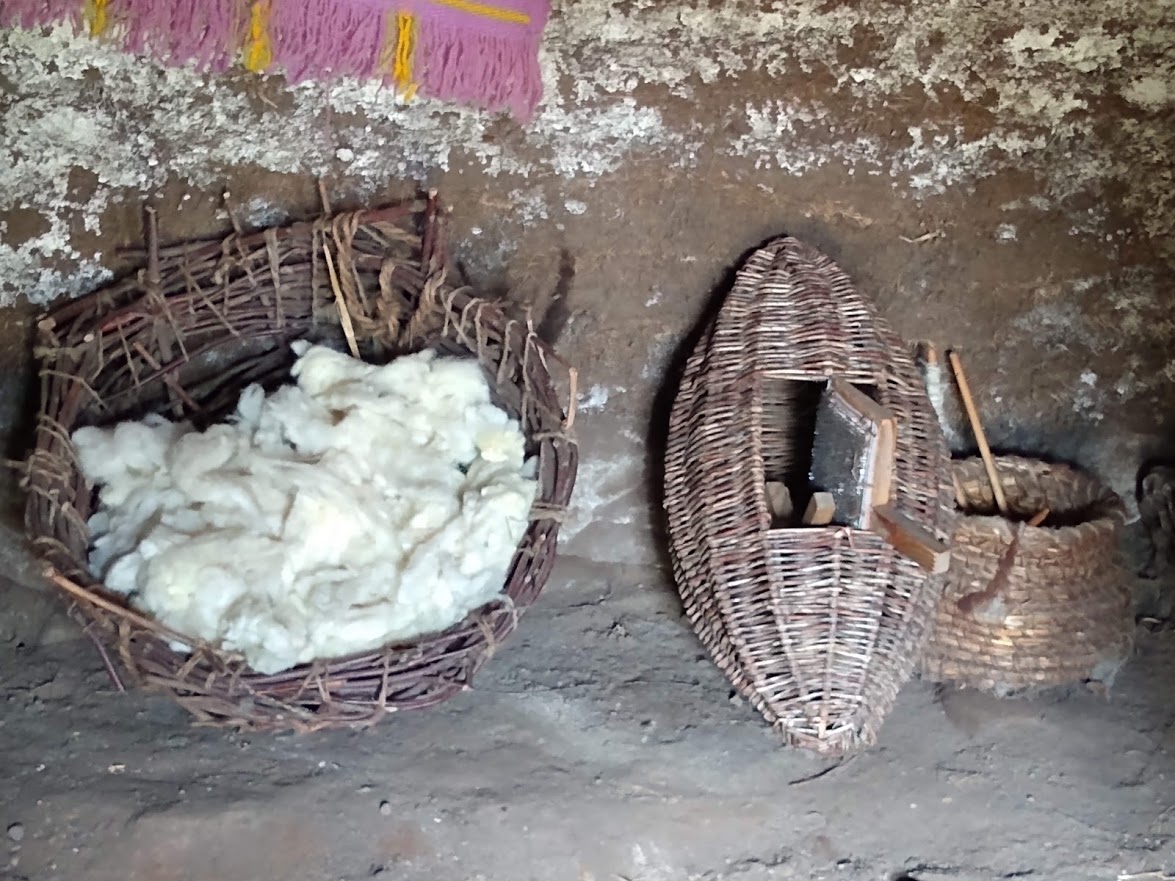
I’m not going to bore you with all my holiday snaps, but I must just tell you about the Highland Folk Museum outside Kingussie. This open air living history museum features a collection of relocated buildings, including “Baile Gean”, a unique reconstruction of an early 1700s Highland township. These buildings were particularly fascinating, with foundations of stones supporting turf walls, thatched with heather. The texture of the lichen and heather was rather lovely.

highland folk museum thatch

There were also a few baskets around, including coiled straw baskets (now critically endangered) and a mudag, a rugby-ball-shaped basket for holding carded wool.

highland folk museum coiled straw basketshighland folk museum mudag

And of course there were also some highland cattle – what’s not to like?

highland folk museum highland cow

May 2021 roundup

Apologies for the lateness of this post – as life starts reopening I suddenly seem to be very busy!

The big news this month is that I’ve managed to get to a real exhibition – the first one for months.

When I first started learning about the shibori technique, I read about a Japanese textile company called Nuno, which created innovative fabrics that often had shibori characteristics. So when Japan House in London announced the exhibition Making Nuno: Japanese Textile Innovation from Sudo Reiko, I booked up straight away.

japan house nuno 1

The exhibition is small but perfectly formed. A loom installation has the reels of thread set up to mimic one of the Nuno designs, and is beautifully lit to create striking shadows. Peering between the threads at the loom makes you feel as if you’ve just hit warp speed (ho ho).

japan house nuno 2

The exhibition focuses on three of Nuno’s innovative fabrics. Polyvinyl alcohol is a synthetic resin that shrinks at 60Β°C. It is screenprinted onto polyester taffeta in a grid pattern and then heated to produce the wriggly “Jellyfish” fabric.

japan house nuno 5japan house nuno 3

“Chemical lace” is made by stitching ribbon onto a water-soluble base, which is then dissolved to leave just the ribbon design.

japan house nuno 4

The third fabric laminates washi paper onto velvet, producing a rich contrast in textures. Sorry there’s no image of this – it was white on white and was difficult to get a good photo.

A series of films shows the production process of many other fabrics in different mills around Japan and is worth watching. Upstairs, a patchwork “curtain” showcases samples of even more fabrics.

japan house nuno 6

Making Nuno: Japanese Textile Innovation from Sudo Reiko runs at Japan House until 11 July.

Twining and coiling

On the making front, I managed to finish my twined dodecahedron!

twined dodecahedron

I wasn’t sure whether to trim the ends further or leave them wild and woolly – Instagram opinion was fairly unanimous about leaving them wild. πŸ™‚

In class at City Lit we made some twined ladles with paper string.

twined ladles

The string I used for the first one (on the left) was a bit bulky, so I made another one (on the right) that was much better.

I also had a go at starting twining with an overlapping base, which was a bit fiddly but worked OK in the end.

twined overlapping base 2twined overlapping base

I also experimented with coiling, trying out a technique described in Annals of the South African Museum, a book owned by my tutor Polly Pollock. This technique, which incorporates ribs in the coiling, was used on bee skep in South Africa.

First of all I tried making a flat sample with rigid ribs (cane) and a bundle of dried unknown vegetation as the core, wrapped with very fine chair cane.

bee skep coiling

Then I tried it in the round using softer materials (polished flax for the ribs and core, and hemp for wrapping). This was much easier.

bee skep coiling soft

Finally, the first issue of the Basketmakers’ Association Newsletter that I edited was published this month. It was hard work for me and the volunteer designer Anita, but we’ve had extremely positive feedback, so it’s good to know that our efforts are appreciated!

ba newsletter may 2021

April 2021 roundup

It definitely feels as if spring has sprung. The weather has turned (for now), the garden is a riot of green, and I’m back at college. There does seem to be a sense of hope and renewal in the air – let’s hope it lasts!

Our first sessions back at City Lit are focusing on twining with John Page. We started off using sisal and jute, getting a feel for tension, increasing and decreasing the width, and use of colour.

twining with sisal and jute

We also looked at an alternative start, the square start, which results in a double-layered base, which can be two different colours. I combined this with waling in three colours, ending up with a bowl where the inside is completely different from the outside.

square start basket inside square start basket outside

I also had a go at making a bowl in my signature pattern from discarded telephone wire, begged from phone engineers whenever I pass a junction box.

bowl made from telephone wire

We then moved on to making pouches, where we learned about the tendency for flat pieces to twist, and the importance of using reverse twining to help counter this. It produces a chevron pattern, which adds extra interest.

twined pouch

I also attempted to make a ribbed pouch, by using alternating thick and thin stakes and thick and thin weavers. My hope was that the thin weaver in front of the thin stakes would recede, while the thick weaver in front of the thick stakes would protrude, giving a ribbed effect.

However, this didn’t work out, partly because the last stake on one side is the same thickness as the first stake on the other side, so while the thin weaver will be in front of the thin stake on one side, it will be in front of the thick weaver on the other side! It’s not very obvious from the photos, so you’ll have to take my word for it. However, it does give the stakes more prominence in the overall pattern.

Thin weaver in front of thin stakes
Thin weaver in front of thick stakes

So far we had worked with soft materials. For homework we were asked to make a sample of twining materials on rigid stakes. Nobody said it had to be flat and straight. πŸ˜‰

I had some cane that was coiled up, so it was curved. I cut out a series of C shapes and twined them together roughly in the centre. I decided not to use reverse twining to see if I could get the piece to twist. And it worked!

Time to try some openwork twining. One of the handouts we were given had various diagrams showing different types of staggered twining, including one over a double warp (“staggered weft twining over double transposed warp” was the actual description). Nothing like jumping in at the deep end, so I had a go.

First I tried a flat piece, which worked fine – once I remembered to keep the warps in the same layers and not to cross warp threads of the same colour.

Then I tried a piece in the round, but I couldn’t get the pattern to work continuously. You can’t see it in the photo below, but the pattern along the edge where the rounds joined is a complete mess. It wasn’t until I gave up and looked more closely that I realised that I needed an odd number of each colour of warp threads – d’oh! When I pulled out one of each thread the pattern did indeed work – though I then had too many twined threads.

So I had another go, this time with odd numbers of warp threads – and it worked. I finished off by twining around the warps from both sides at the bottom to create a pouch. Apologies for the photo – it’s tricky to shoot a two-sided see-through object.

And after all this, I’ve also made progress on the twined Work in Progress I showed you last month. Hopefully by next month it will be finished!

March 2021 roundup

The big news this month is…drumroll…I have finished the Tetrapak dog!

tetrapak dog 4tetrapak dog 5

Any suggestions of what to call him or her? πŸ™‚

I also tried a variation on a theme, making a circular coiled pot with a lid based on my previous tortoise vessels. Because the peaks resemble limpet shells, I’ve called this a limpet pot.

limpet pot 1limpet pot 2limpet pot 3

Another construction I’ve been involved in was a bike shed in the front garden. This was not particularly creative – I just mention it because it took a lot of time and effort this month! The very heavy shed arrived in bits and had to be pieced together on a concrete base that we had previously laid.

Much huffing, puffing, and swearing ensued, not to mention a couple of broken drill bits. I also ended up falling into wet concrete at one point – and the local wildlife were determined to leave their marks too!

But now the shed is up, and I am able to get into the house without squeezing past a couple of bikes and associated paraphernalia. We just need to plant a fast-growing shrub to cover up the unattractive exterior.

bike shed

With restrictions on lockdown slowly lifting, our two-year basketry course at City Lit is due to resume in mid-April, more than a year since it stopped. I’m really looking forward to being back in the classroom, especially now that I’ve had my first coronavirus vaccination.

We are going to be starting on twining, so I thought I might try to get ahead a bit and started on a new experiment. This is very much a Work In Progress! πŸ˜‰

twined wip

Hopefully this will be more presentable next month.

In the meantime, I wish you all a happy Easter.

February 2021 roundup

I’ve spent most of February working on a commission for a tortoise vessel. Someone saw my black and yellow one on Instagram and asked if I could make one in a different colourway.

As before, I started by making the individual scutes.

coiled turquoise tortoise scutes

Then I joined them together and added the border.

coiled turquoise tortoise lid

Then I made the base with the hidden tortoise design.

coiled turquoise tortoise vessel

The client was very pleased, and so am I.

Dorset buttons and looping

Although our basketry group has still heard nothing about when our course will resume, we are still meeting every fortnight on Zoom, and choosing a theme to work on for each session.

The first one was Dorset buttons. To be honest, I found this a bit fiddly. I normally like fiddly, but maybe I needed a break after the fiddly work on the tortoise. But I did manage to produce a button!

dorset button

Then we had a go at looping. I found this more relaxing and tried two methods. The first one was looping around a stone, starting at the opening on top and closing it together on the bottom.

looped stone top
looped stone bottom

As you can see, the looping pattern looks quite regular on the top and sides, but becomes more irregular and organic on the bottom where I pulled the loops together to close up.

I also made a looped basket with homemade cordage, this time starting at the bottom and working up to finish at the opening. The advantage of this is that I made the cordage as I went along, so didn’t have to worry about how to hide the joins.

Tetrapak dog update

I’ve made a bit of progress on the dog. The back half is complete, along with the head and the front legs.

Back legs and tail
tetrapak dog  head
Head

I only need to drink another five cartons of orange juice to get enough material to finish it!

Packaging material and ice

One of the highlights of my month was receiving a delivery (replacement butter dish, not very interesting) wrapped in some fantastic packaging material – some kind of pierced brown paper.

What was interesting is the way the paper had opened up and retained the form of what it was wrapped around, a bit like memory foam.

Apparently, according to comments on my Instagram post, it’s called Geami WrapPak. I’ve saved it until I can work out what to do with it!

We also had a very cold spell, where temperatures didn’t rise above 0ΒΊC for several days. A basin of water I’d left in the garden froze solid – a chance to try making an ice sculpture by moving the frozen block into a different position every day.

However, the temperature rose again before I could get the full propeller effect!

As I write this, it’s warmed up enough for the first frogspawn to appear in the pond.

The other news is that I am to be the new editor of the Basketmakers’ Association newsletter. Although it’s called a newsletter, it’s a 68-page journal that is published four times a year, so it will be quite a lot of work! But there is a very supportive team (we are all volunteers), and I’m looking forward to making lots of interesting contacts with some fantastic basketmakers. So wish me luck!